
Introduction
Welcome to the Trust Guard (TG) API!
You can use our API to access Trust Guard API endpoints, which can get information on various companies, users, scans & results in our database.
API via Web Form
This chapter contains the latest information in creating new regular, trial, and freemium merchants
Important Setup
These are the required resellerID and apikey that needs to be secured before proceeding.
Reseller ID and Form API Key
resellerID- Assigned by TG. You can get it from Reseller Overview Page[Resellers > Overview]See image below:

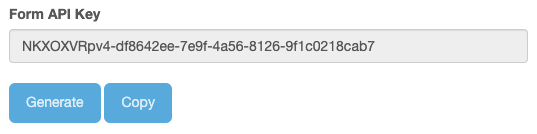
apikey- Can be generated in Edit API Account page[Management > API Account > edit]See image below:
Create Trial Merchant
This api is used to create TRIAL merchant
Request:
curl -X POST "<api_url>/api/company.php/post_createtrialmerchant"
Response:
{
    "companyID": "X3Z0o9GRPL",
    "companyName": "Test Trial Merchant",
    "mid": "a10023",
    "adminName": "Trial Merchant Admin",
    "adminEmail": "admin@trialmerchant.com",
    "messages": ["company created!"],
    "success": true,
    "status": 200
}
HTTP Request
POST <api_url>/api/company.php/post_createtrialmerchant
Request Attributes
| Attribute | Description | Type | Required |
|---|---|---|---|
| companyName | name of merchant | String | true |
| companyAddress | merchant address | String | true |
| companyCity | merchant city | String | true |
| companyCountry | merchant country | ISO 3166-1 alpha-2 | true |
| companyZip | merchant zip | String | true |
| billingB2UID | for B2U purposes | String | |
| resellerID | assigned by TrustGuard | String | true |
| mid | id of the merchant in your database | String | |
| companyVAT | merchant VAT | String | true |
| companyCOC | merchant COC | String | true |
| customerName | admin name | String | true |
| customerEmail | admin email | String | true |
| customerPhone | admin phone number | String | true |
| customerLanguage | Prefered language. options: (en/nl) | ISO 639-1 | true |
| apikey | FORM API KEY | String | true |
Create Freemium Merchant
This api is used to create FREEMIUM merchant
Request:
curl -X POST "<api_url>/api/freemium.php/post_createmerchant"
Response:
{
    "companyID": "X3Z0o9GRPL",
    "companyName": "Test Freemium Merchant",
    "mid": "a10023",
    "adminName": "Freemium Merchant Admin",
    "adminEmail": "admin@freemiummerchant.com",
    "messages": ["company created!"],
    "success": true,
    "status": 200
}
HTTP Request
POST <api_url>/api/freemium.php/post_createmerchant
Request Attributes
| Attribute | Description | Type | Required |
|---|---|---|---|
| customerName | admin name | String | true |
| customerEmail | admin email | String | true |
| customerPhone | admin phone number | String | true |
| customerUrl | admin phone number | String | true |
| resellerId | assigned by TrustGuard | String | true |
| companyName | name of merchant | String | true |
| customerLanguage | Prefered language. options: (en/nl) | ISO 639-1 | true |
| customerCountry | merchant country | ISO 3166-1 alpha-2 | true |
| mid | id of the merchant in your database | String | |
| apikey | FORM API KEY | String | true |
Create Regular Merchant
This api is used to create Regular merchant
Request:
curl -X POST "<api_url>/api/company.php/post_createmerchant"
Response:
{
    "companyID": "X3Z0o9GRPL",
    "companyName": "Test Regular Merchant",
    "mid": "a10023",
    "adminName": "Regular Merchant Admin",
    "adminEmail": "admin@regularmerchant.com",
    "messages": ["company created!"],
    "success": true,
    "status": 200
}
HTTP Request
POST <api_url>/api/company.php/post_createmerchant
Request Attributes
| Attribute | Description | Type | Required |
|---|---|---|---|
| companyName | name of merchant | String | true |
| companyAddress | merchant address | String | true |
| companyCity | merchant city | String | true |
| companyCountry | merchant country | ISO 3166-1 alpha-2 | true |
| companyZip | merchant zip | String | true |
| billingB2UID | for B2U purposes | String | |
| resellerID | assigned by TrustGuard | String | true |
| mid | id of the merchant in your database | String | |
| companyVAT | merchant VAT | String | true |
| companyCOC | merchant COC | String | true |
| customerName | admin name | String | true |
| customerEmail | admin email | String | true |
| customerPhone | admin phone number | String | true |
| customerLanguage | Prefered language. options: (en/nl) | ISO 639-1 | true |
| apikey | FORM API KEY | String | true |
Seal Codes via API
This chapter covers getting ready-to-paste Trust Guard seal codes for your clients' websites from your own systems. They are the same codes the reseller seal code generator in the Trust Guard dashboard makes.
Before You Start
These calls use your Form API Key, the same apikey as API via Web Form. Reseller ID and Form API Key shows where to find it. The key looks like Ab3dE5gH7j-1b9d6bcd-bbfd-4b2d-9b5d-ab8dfbbd4bed.
- Send it in an
X-API-Keyheader on every request. Don't put it in the URL, in the request body or in anAuthorizationheader. - It only works from the IP addresses on its API account (Management > API Account). Add your servers' addresses there before you start, and update them when they change.
- Keep it on your servers. Never put it in a web page, in browser JavaScript or in an app: anyone who has it can get seal codes for all your clients' sites.
- Generating a new Form API Key stops the old one at once. Do that if the key may have leaked.
Both calls are GET requests and answer in JSON. <api_url> is the base URL from API Base URL.
List Seal Sites
Request:
curl "<api_url>/api/seals.php/getapisealsites" \
  -H "X-API-Key: <form_api_key>"
Response:
{
    "data": [
        {
            "did": "Xk2pQ9vLmA",
            "url": "www.example-shop.com",
            "alias": "Example Shop",
            "frequency": "weekly",
            "company": { "cid": "Bq7Lz0RwTe", "name": "Example Shop BV" }
        }
    ],
    "messages": ["success"],
    "success": true,
    "status": 200
}
This api returns every website you can get a seal code for. A site is listed when:
- it belongs to one of your client companies, and that client hasn't cancelled
- the client has ticked Allow to access your Scan Results for your company on that domain
- it's active and scanned on a schedule
- it's a domain name, not an IP address
HTTP Request
GET <api_url>/api/seals.php/getapisealsites
Response Attributes
| Attribute | Description | Type |
|---|---|---|
| did | the site's ID: pass it to Get Seal Code | String |
| url | the website's domain | String |
| alias | the site's name in the Trust Guard dashboard | String |
| frequency | how often the site is scanned: daily, weekly, monthly or quarterly | String |
| company.cid | the ID of the client company the site belongs to | String |
| company.name | the name of that company | String |
Get Seal Code
Request:
curl "<api_url>/api/seals.php/getapisealcode?did=Xk2pQ9vLmA&color=white&placement=right&lang=nl&address=office&vat=1" \
  -H "X-API-Key: <form_api_key>"
Response:
{
    "data": {
        "did": "Xk2pQ9vLmA",
        "url": "www.example-shop.com",
        "company": { "cid": "Bq7Lz0RwTe", "name": "Example Shop BV" },
        "settings": {
            "color": "white",
            "type": "outer",
            "placement": "right",
            "dateformat": "dd-mm-yyyy",
            "lang": "nl",
            "address": "office",
            "phone": false,
            "email": false,
            "vat": true,
            "coc": false
        },
        "svgUrl": "https://trustseals.trust-guard.com/security/seals/4kq8w1v0zx3y7m2n5p9r6t0s.svg?color=white&type=outer&placement=right&dateformat=dd-mm-yyyy&lang=nl",
        "certificateUrl": "https://trustseals.trust-guard.com/security/www.example-shop.com?id=8d3k0q9x2w7v5m1n4p6r0t2s",
        "html": "<link rel=\"stylesheet\" rel=\"preload\" href=\"https://trustseals.trust-guard.com/security/res/cert-style-v2.0.2.css\" … </script>",
        "gtm": "<link rel=\"stylesheet\" href=\"https://trustseals.trust-guard.com/security/res/cert-style-v2.0.2.css\" … </script>",
        "status": {
            "visible": true,
            "reason": null,
            "scanDate": "2026-10-20",
            "graceUntil": null,
            "message": null
        }
    },
    "messages": ["success"],
    "success": true,
    "status": 200
}
This api returns the seal code for one of the sites from List Seal Sites, made with the settings in the query string.
HTTP Request
GET <api_url>/api/seals.php/getapisealcode?did=<did>
Query Parameters
| Parameter | Description | Values | Default | Required |
|---|---|---|---|---|
| did | the site's ID, from List Seal Sites | String | true | |
| color | the seal's color | green, black, white | green | |
| type | the shield's style. Ignored for checkout-banner | outer, inner | outer | |
| placement | where the seal goes on the page | left, right, standalone, checkout-banner | left | |
| dateformat | how the seal writes the scan date | dd-mm-yyyy, mm-dd-yyyy, yyyy-mm-dd, dd-mmm-yyyy, mmm-dd-yyyy, yyyy-mmm-dd | dd-mm-yyyy | |
| lang | the seal's and the certificate's language | en, nl, de, fr, it, es, pt | en | |
| address | the address the certificate shows | office, postal, or empty for none | none | |
| phone | show the client's support phone number on the certificate | 1 or 0 (true and false also work) | 0 | |
| show the client's support email address on the certificate | 1 or 0 | 0 | ||
| vat | show the VAT number on the certificate | 1 or 0 | 0 | |
| coc | show the Chamber of Commerce number on the certificate | 1 or 0 | 0 |
- Names and values: parameter names are lower case, and values aren't case-sensitive.
- Errors instead of defaults: an unknown parameter or value returns a
400, so a typo never quietly gives you the default instead. - Missing details: details the client hasn't filled in are left off. If you ask for an address they haven't filled in, their other address is shown instead, if they have one. The
settingsin the response say what the code actually shows.
The placements:
- left and right: the seal floats in the bottom-left or bottom-right corner of every page the code is on. Hovering over it shows the certificate details.
- standalone: the seal appears as an image where you put the code, and links to the certificate.
- checkout-banner: a wide banner for checkout pages appears where you put the code, and links to the certificate.
Response Attributes
| Attribute | Description | Type |
|---|---|---|
| html | the seal code to paste into the website | String |
| gtm | the same code for Google Tag Manager | String |
| settings | the settings the code uses, named like the query parameters. type is null for checkout-banner |
Object |
| svgUrl | the seal image the code shows | String |
| certificateUrl | the certificate page the seal links to | String |
| status | whether visitors see the seal right now: see Seal Status | Object |
| did, url, company | the site, as in List Seal Sites |
Putting the Code on the Website
Paste html into the website's pages:
- For left and right: the footer template is the easiest place. The seal floats in its corner, and every page shows it.
- For standalone and checkout-banner: put the code where the seal should appear.
If the website adds code through Google Tag Manager, use gtm in a Custom HTML tag instead. It's the same code without SRI integrity hashes, which Google Tag Manager doesn't support. Those hashes make browsers refuse Trust Guard's script if it were ever tampered with, so use html whenever you can edit the website's pages. For standalone and checkout-banner, html and gtm are identical, because those codes load no script.
Seal Status
You always get a code back, but visitors only see the seal while the site qualifies for one. Until then the seal image is blank.
| Attribute | Description |
|---|---|
| visible | true when visitors see the seal now |
| reason | why they don't, or soon won't. null when all is well |
| message | the reason as a sentence you can pass on to your client |
| scanDate | the date of the last completed scan (YYYY-MM-DD), or null |
| graceUntil | when the seal stops showing if no scan passes before then (YYYY-MM-DD), or null |
The reasons you can get:
| Reason | Meaning |
|---|---|
| scan_failed | the last scan didn't pass |
| scan_blocked | the last scan found nothing at all. This almost always means the website's firewall blocked our scanner |
| no_scan | the site has no completed scan yet |
| trial_expired | the client's trial has ended |
| seals_disabled | seals are switched off for this client |
After scan_failed, scan_blocked or no_scan, the seal keeps showing for four days after the last scan that passed. During that time visible stays true, and graceUntil gives the end date. Treat any other reason you get the same way: the seal isn't showing, or soon won't be.
Seal Code Errors
An error comes with its HTTP status code and the reason in the errors array:
| HTTP | errors | What to do |
|---|---|---|
| 400 | site [did] is missing in your request |
Add the site's did. |
| 400 | unknown parameter [...], [...] must be one of: ... |
Fix the settings. Every problem with them is listed together. |
| 401 | API key missing - send it in an X-API-Key header |
Send your key in the X-API-Key header. |
| 401 | API key not valid |
Check the key. A key stops working once a new one is generated, or when its API account is switched off. |
| 403 | <IP address> is not on the IP allowlist of this API account |
The message shows the address your request came from. Add it to the API account. |
| 403 | seal codes are for API accounts of active reseller companies |
Contact us. |
| 404 | site [did] not found |
The site isn't in your List Seal Sites any more. For example, the client no longer allows your access, or the site isn't scanned on a schedule. |
Seal Codes in Postman
You can try both calls in Postman without writing any code. You need:
- the Postman desktop app
- the Postman collection reseller-seal-api.postman_collection.json, which you can also get from your Trust Guard contact
- your Form API Key
Postman sends requests from your computer, so your computer's public IP address must be on your API account.
Set Up the Collection (once)
- Open Postman and click Import.
- Drop the collection file into the window, or click files and choose it. Trust Guard Reseller Seal API appears under Collections in the sidebar.
- Click Trust Guard Reseller Seal API in the sidebar, then click its Variables tab.
- In the
apiKeyrow, paste your key into the Current value column. Leave Initial value empty: Postman shares the initial value when you sync or export the collection, but keeps the current value on your computer. - To use the Testing environment, set the current value of
baseUrltohttps://devapi.trust-guard.com/api/seals.php. It starts as Production's address. - Save with Ctrl+S, or Cmd+S on a Mac.
List Your Sites
- In the sidebar, expand the collection and click List sites.
- Click Send. The response shows 200 OK and your sites.
- Above the response body, click Visualize to see your sites as a table. The first site's
didis now saved in the collection'sdidvariable, ready for the next request.
Get a Seal Code
- Click Get seal code in the sidebar, then click Send. The response shows 200 OK.
- Click Visualize. It shows the seal, a warning if visitors can't see the seal right now, and the seal code. Click in the code, select all and copy it.
- To change the seal, open the Params tab under the address. Tick a setting, for example
placement, change its Value, and click Send again. The Description column lists the values each setting takes. - To get another site's code, copy its
didfrom the List sites table. On the Params tab of Get seal code, replace{{did}}in thedidrow with it, and click Send.
If Something Goes Wrong
| The response says | What to do |
|---|---|
401: API key missing or not valid |
Check the apiKey current value: the whole key, with no spaces. Then save the collection. |
403: ... is not on the IP allowlist |
The message shows your computer's address. Add it to your API account. |
404: site [did] not found |
That did isn't one of your sites. Send List sites and copy one from there. |
400 |
A setting has a value it doesn't take. The Description column on the Params tab lists the values. |
Maintenance via API
The following sections cover the TrustGuard REST API used to authenticate and maintain merchant records, devices, and scans programmatically.
Getting Started
API Base URL
| Environment | URL |
|---|---|
| Testing | https://devapi.trust-guard.com |
| Production | https://api.trust-guard.com |
Notes
- TG API using TLS 1.2 protocol for securities.
- Use POSTMAN collection for reference API calls.
This chapter provides step-by-step instructions for using TrustGuard Third Party API and is divided in to the following sections:
Step 1. Web Portal: Obtaining API Key
Step 2. Server Request: Using API Key
Important Note
Web Portal: Obtaining API Key
First, login to trustguard portal.
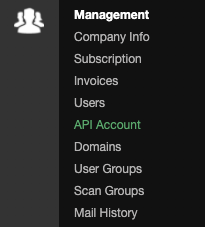
After login, go to Management > API Account through the link on the left sidebar to go to API Account Management Page
To add a new user, press Add API Account button
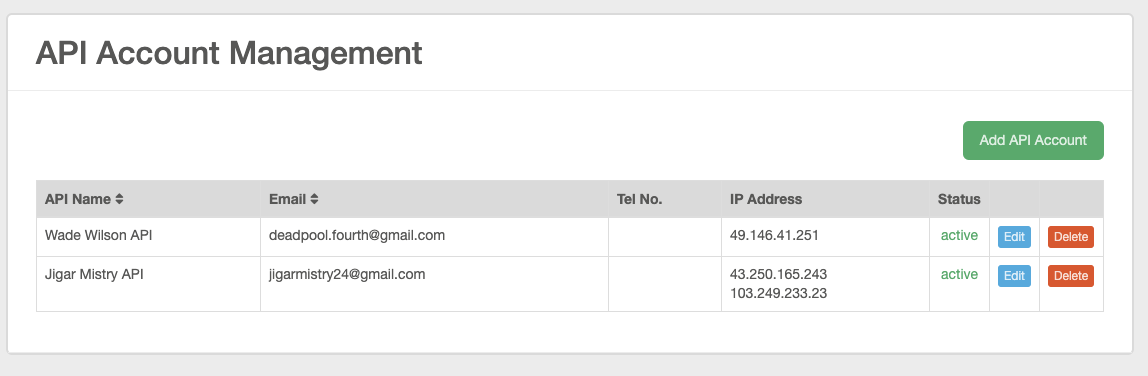
Fill-in the fields then press Save
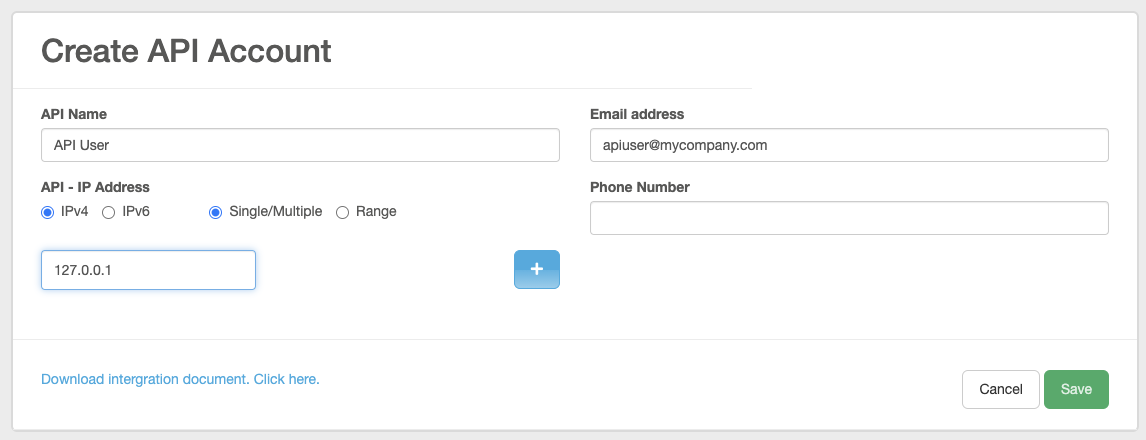
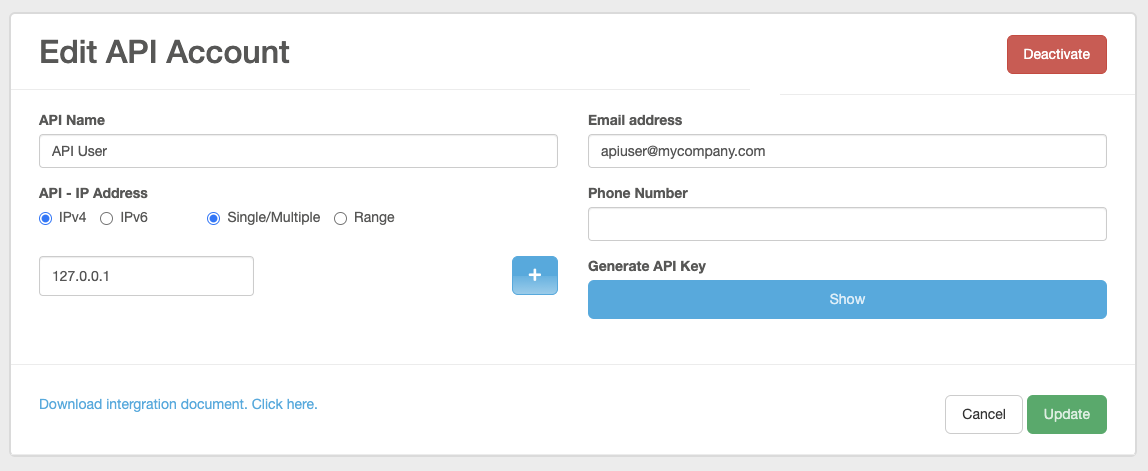
To obtain the API User's API Key press Edit Button

In the Edit API Account press the Show Button
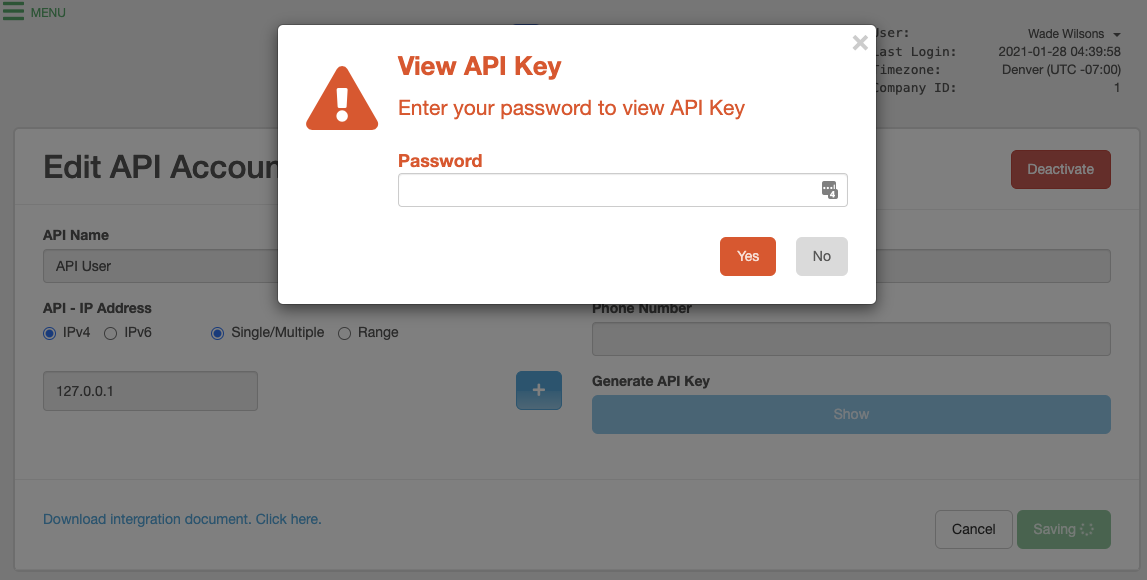
A popup will show that will ask for your Password
Generate API Key text area will now be available which contains your API Key
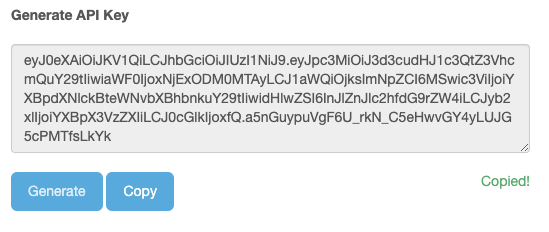
Copy the generated API Key and save it for later use.
Server Request: Using API Key
An API Testing Tool such as Postman is required to interact with the API.
The API Key we generated will be used to obtain an ACCESS_TOKEN. This token is required to interact with the API.
Please refer to this section for instructions on how to obtain an ACCESS_TOKEN.
Token
Get Refresh Token
This is the way to get API account token to authenticated API calls with TG portal. Admin of TG company can create new API account from TG portal and get token of particular API account.
Steps
- Login into TG portal.
- Go to “API Account” side menu option and click on “Add API Account”.
- Add required fields and save API account.
- Go to edit API account page and generate
REFRESH_TOKENand copy it. It will require password of admin to access it.
Get Access Token
Request:
curl -X POST "<api_url>/partner-api/auth/renew"
  -H "Authorization: Bearer <REFRESH_TOKEN>"
Response:
{
  "accessToken": "<token>",
  "exp": "2019-07-29T09:32:51+00:00",
  "messages": ["success"],
  "success": true,
  "status": 200
}
exp- Expiry date of access token
messages- Messages array will include success messages
errors- Errors array will include error messages
This API allows you to get ACCESS_TOKEN for particular API account so API account can access TG APIs for various operations. This API needs API Account Token generated from TG portal “Add API Account” page.
HTTP Request
POST <api_url>/partner-api/auth/renew
Replace api_url with API base URL.
Scan
Get Recent Scans
Request:
curl -X GET "<api_url>/partner-api/scans?range=2month"
  -H "Authorization: Bearer <ACCESS_TOKEN>"
Response:
{
    "currentPage": 1,
    "totalPage": 40,
    "data": [
        {
            "cid": 26,
            "companyName": "Test Company",
            "did": 13195,
            "mid": "A0192",
            "device": "test.com",
            "name": "test.com",
            "frequency": "daily",
            "scanResultID": 254788,
            "status": "failed",
            "progress": 100,
            "pciStatus": "pass",
            "malwareScanStatus": "pass",
            "sslDate": "2021-02-01 23:59:59",
            "created": "2019-01-24 22:29:02",
            "finished": null,
            "high": null,
            "medium": 2,
            "low": 10,
            "total": 12
        }
    ],
    "messages": ["recent scans returned"],
    "success": true,
    "status": 200
}
This API allows you to get multiple scan results based on range and limit. This API will return all scan results from all companies under requested API account.
HTTP Request
GET <api_url>/partner-api/scans?range=2month
GET <api_url>/partner-api/scans?range=2month&page=1
GET <api_url>/partner-api/scans?from=2024-01-01&to=2024-01-20
Request Parameters
- range
Results from NOW – interval.
?range=numberunit
i.e. 3month
unit values: • minute • hour • day • week • month • quarter
- page
Offset of result. 1 page yields 100 results at most.
- from | to
Results from DATE1 to DATE2.
?from=YYYY-MM-DD&to=YYYY-MM-DD
i.e. ?from=2024-01-15&to=2024-02-15
- limit
The number of devices returned
SSO
Single Sign On
Request:
curl -X POST "<api_url>/partner-api/auth/signin"
  -H "Authorization: Bearer <ACCESS_TOKEN>"
  -d '{<json_request_parameters>}'
Response:
{
  "dashURL": "<dash_url>",
  "messages": ["success"],
  "success": true,
  "status": 200
}
This API is used to get access to TG client portal for users using single sign-on from third party portal.
HTTP Request
POST <api_url>/partner-api/auth/signin
Request Attributes
| Attribute | Description | Type | Required |
|---|---|---|---|
| cid | Company Id assigned by TG | Number | true |
| uid | User Id assigned by TG | Number | true |
Response Attributes
| Attribute | Description | Type |
|---|---|---|
| dashURL | TG Client Dashboard URL for user to login | String |
Errors
The Trust Guard API uses the following generic error codes:
| Error Code | Meaning |
|---|---|
| 200 | Successful -- OK request. |
| 201 | Created -- Your requested resource created. |
| 400 | Bad Request -- Your request is bad. |
| 401 | Unauthorized -- Your API key is wrong or insufficient client credentials. |
| 403 | Forbidden -- You don't have access to requested resource. |
| 404 | Not Found -- The specified resource could not be found |
| 500 | Internal Server Error -- We had a problem with our server. Try again later. |
| 503 | Service Unavailable -- We're temporarially offline for maintanance. Please try again later. |
- API response will return
errorsarray with errors in response. - API response will return
messagesarray with success messages in response.